Estimate Header/Order Header
Updated September 15, 2021
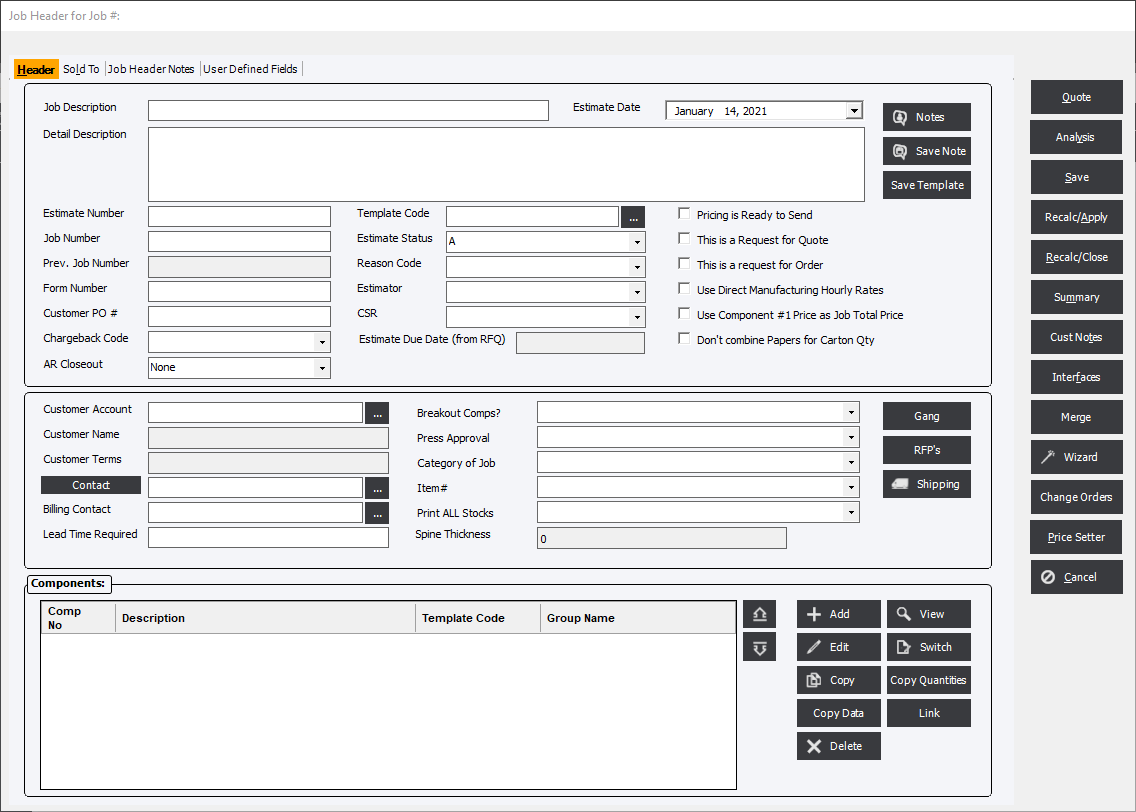
When the "Header" tab (on the "Estimate Header for Estimate #" screen or the "Job Header for Job #" screen) is selected, the following data fields and functions will be displayed
Estimate Header Screen

Estimate Date
Date the estimate was created. The default will be the current date, but the user may manually enter a date.
Job Description
Enter a brief description that will identify the estimate or order.
Detail Description
A text data field (2000 characters, maximum) where the user may enter descriptive comments related to the estimate or order. Click the Save Note button to save the description to a table in the database (for future selection).
Header Notes
The "Notes" function is related to the "Detail Description" field. Click Notes to view descriptions previously saved as a note. The user may select a note from a list and that note will be entered in the "Detail Description" field. The user may select and combine several notes.
Estimate Number
The estimate reference for an estimate or an order. Although this field is referred to as a “number”, in reality the data type is a text data type. The estimate reference, therefore, may be numeric, alphabetic or alphanumeric. When an estimate or order is saved, the system will automatically assign a unique, integer number, provided that the user has not entered anything in the "Estimate Number" field. Alternately, the user may enter an estimate reference manually.
The 'number' that will be assigned will be based on the starting number entered in Standards Module (StandardsFileMaint./File/Starting Numbers). The system will not automatically increment alphabetic or alphanumeric estimate number references.
On the "Order Header" screen, If the order was not converted from an existing estimate, then the Estimate Number field will be blank.
Job Number
The job reference for an estimate or an order. Again, although the field is referred to as a “number”, the field is in reality a text data type. Therefore, the "Job Number" may be numeric, alphabetic or alphanumeric.
For an estimate, this field will typically be blank, unless the estimate was created from an existing order.
When saving an order, the user may enter a Job Number, manually, or the system will automatically assign a unique number (if the user has not entered anything in the Job Number field). The integer number that will be assigned will be based on the starting number previously entered in Standards (StandardsFileMaint./File/Starting Numbers). The system will not automatically increment alphabetical or alphanumeric references.
Previous Job Number
Form Number (Informational)
The user may enter a Form Number (alphanumeric), as applicable. This field is primarily used for searches.
Customer PO
Enter Customer PO reference, if applicable. The Customer PO will be carried over to the Job Planning Screen, Shipping and further to the invoicing of the job.
Chargeback Code
The Enterprise 32 system includes chargeback features that will allow a user to allocate charges in various ways. These features will be of particular interest to In-Plant operations.
The user may distribute charges to one or more accounts and may elect to distribute either to customer accounts or to chargeback codes that will be defined in the Standards Module.
To enable chargeback, the user must set options in System Settings (Standards) and also in Customers (Standards).
Enterprise 32 does not include a generic chargeback report as each user will typically have a different set of reporting requirements. Usually, a custom program interface (and chargeback report) would be developed by EPMS, on a custom basis, for the user that would include features such as a date range filter or options for printing a hard copy of the report or writing data to a text file. The custom chargeback program interface would be accessed from within the Enterprise 32 program using the Reports Module (Reports/Sales Reports/Chargeback Report).
For additional information, Standards Module/Chargeback features.
Template Code
Allows the user to select a Joh Header type of template that can bring in more than 1 component into an estimate or order at a time.
Estimate Status
Each estimate will be assigned a status. The purpose of this is to allow the user to analyze the success of estimating efforts.
Reason Code
Reason Codes may be set here to describe the reason for the status of the estimate. See Also Reason Code.
Estimator
This field will display the person who has estimated the project or job for the customer. By default the field is blank. The user can select a different Estimator by clicking the down-arrow to display all Estimators defined in the system.
To define the Employees that are Estimators refer to the File Maintenance/Employees.
CSR
CSR refers to “Customer Service Representative”. This field will display the person who has responsibly for the customer. By default the field is blank but will populate automatically if an Customer Account is selected with a CSR defined. The user can select a different CSR by clicking the down-arrow to display all CSR’s defined in the system.
To define the Employees that are CSR's refer to the File Maintenance/Employees.
Estimate Due Date (from RFQ)
This is the date that is entered in from the RFQ module letting the Estimator know when the quote is expected to be ready.
Pricing is Ready for Online
This option is used in conjunction with MyAccounts web portal to indicate to the web portal that the price can be viewed by the customer.
This is a Request for Quote
This option will be automatically set if the estimate is started in the RFQ Module or can be set manually. This will allow the estimator to filter estimates on the Estimate/OE datagrid to only see estimates with this option set. It is a good way for Esitmators/Sales Reps and CSRs to keep track of estimates that may not be
This is a Request for Order
This option works similar to This is a Request for Quote but is not automatically set anywhere in the system.
Use Direct Manufacturing Hourly Rate
The user will have the option to calculate production costs using either a DM Rate or a AI Rate. Refer to Manufacturing Rates.
Don't combine Papers for Carton Qty
In calculating paper cost, the system will determine unit cost by comparing the quantities needed to the price break established in Standards. When creating an estimate or an order, the system will combine paper for all components that use the same paper and will use that value as the quantity in the paper cost grid.
|
Note: The user may need to click the "Recalculate" button in Estimating/Order Entry to get the correct result. |
Customer Account
The Customer Account will uniquely identify a customer. Click on the down-arrow and the system will display a list of customers for user selection. Typically, customer accounts will be entered in the Standards Module (StandardsFileMaint./Customers), but a new customer may also be added “on the fly” using a button located on the "Sold To" tab. Upon selecting a customer, several fields on the "Header" and "Sold To" tabs will be populated using default data entered for the account.
Lead Time Required (Informational)
Lead Time is an information field for user's convenience.
Use Component #1 Price as Job Total Price
On occasion, the user may want to use the component #1 price as the total job price. Select this checkbox option to accomplish this.
Don't combine papers for carton Qty. Calculation
This option will allow the user to combine or not combine quantities for the same paper on multiple components. See also: CartonQty
Spine Thickness
Enterprise will calculate spine thickness of all components combined as long as the caliper of each component's stock is entered.
Job Header Buttons
Quote
Analysis
Save
Recal/Apply
Recalc/Close
Summary
Cust Notes
Interfaces
Wizards
Change Orders
Pricsetter
Cancel
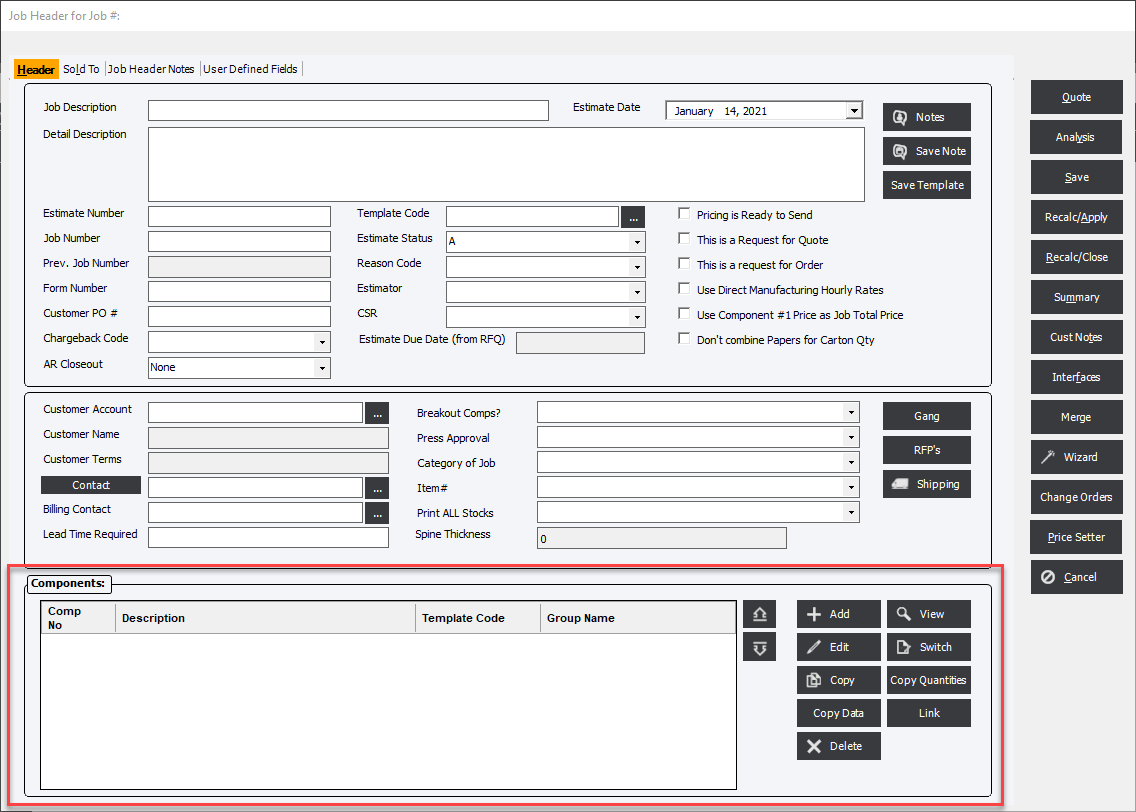
Components
As stated previously, an estimate or order is created using components, which will be listed in the "Components" data frame on the Header tab. Learn More: Components & Component Types
Components Frame

Component Buttons
Add/Edit/Copy Button
Click Add to add a component, Edit to edit (highlight a component), or Copy to copy a component. When adding a component the system will display the appropriate Component Information screen, either Sheetfed, Web, Digital/High Speed Copying, Flexo, Business Forms, Finished Good or Finished Good Kit.
Copy Data
This feature gives the user the ability to make estimate or order changes in one component and copy that across similar components in a Linked Group, Template Code or Component Type.
Delete Button
Click Delete to deleted the selected component.
View Button
Click View to view the details of the selected component. The system will notify the user that changes will not be saved when in View Mode. The user will be able to view component details of the estimate or order on the Header Tab, Layout/Inks/Paper Tab, Processes Tab and the Instructions Tab.
Switch
On occasion, the user will want to switch to a different production method. Click Switch and the system will allow the user to switch between Sheetfed, Digital, Web and Flexo.
Make a selection then click OK.
Copy Quantities Button
Click "Copy Quantities" to copy quantities from one component to other components. The system will display the following dialog:
Link
Allows the user to link or "group" components together for the purpose of quoting.
Arrows
Use the "Up/Down" button function buttons to move a component up or down in the list.
User Defined Labels
In various places within the Estimating/Order Entry Module (and elsewhere), the system will allow the user to associate user-defined information with an estimate or an order, a component of an estimate or order, or with a process or material. The user will be able to do this by defining customized User Defined Labels and Items.
The system will allow the user to define custom labels and, furthermore, to define an unlimited number of items for each label. Labels and items defined by the user may be selected, where appropriate, within the various modules of the Enterprise 32 system.
The action buttons at the bottom of the screen will be available from the Header, Sold To and Instructions tabs.
Related Topics